
Flowers pattern design
 About two years ago, I designed this pretty flower crochet pattern. While it started off as a premium pattern, I’ve decided to bring it to the blog as a free large flower crochet pattern. If you’d like an ad-free PDF copy of the pattern, it’s still available here in my Etsy shop. I know some people just like to have a pretty hard copy in their hands.
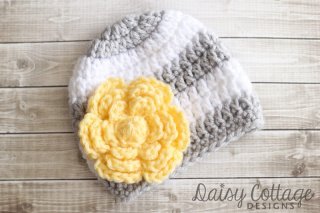
As shown, this large crochet flower has 3 layers and is approximately 4 inches in diameter. There are directions below to make the flower as large as you want it, though!
This flower is the perfect embellishment for hats, bags, and so much more. Whipped up in half an hour or less, it’s a great last-minute gift or accessory for that new outfit.
HAT CROCHET PATTERN: People have been asking where the hat pattern can be found. It’s available for purchase in my Etsy shop. Follow this link.
Materials Needed:
– Worsted weight yarn (I used Hobby Lobby “I Love This Yarn!”)
– I crochet hook (smaller hooks could be used for a smaller, tighter flower)
– Tapestry needle for weaving ends.
 Pattern Notes:
– This pattern is worked through both loops.
– The pattern can be extended to make a larger flower. Notes given at the end of the pattern.
– My finished flower measures just under 4” in diameter (with 3 rounds).
– Helpful hints are located at the bottom of this page.
Flower Crochet Pattern
ch 3.
Round 1: 6 dc into the first chain. Sl st to the top of the first dc. (6)
Round 2: ch 2, 3 dc into the same stitch, ch 2, sl st into the same stitch. *ch 1, sl st in next stitch. ch 2, 3 dc into the same stitch, ch 2, sl st into the same stitch* around. (6 petals made).
Round 3: ch 3. You will bring this chain behind the first petal on the previous round and sl st into ch 1 space between the petals. Do this behind each petal. Behind the last petal, sl st into the first ch 3 space you made. (6 ch 3 spaces made)
Round 4: ch 2, 5 dc into the same ch 3 space, ch 2, sl st into the same space. *ch 1, sl st in next ch 3 space. ch 2, 5 dc into the same stitch, ch 2, sl st into the same space* around. (6 petals made behind first set of 6 petals)
Round 5: ch 4. You will bring this chain behind the first petal on the previous round and sl st into the ch 1 space between the petals. . Do this behind each petal. Behind the last petal, sl st into the first ch 4 space.
Round 6: ch 2, 6 dc into the same ch 4 space, ch 2, sl st into the same space. *ch 1, sl st in the next ch 4 space. ch 2, 6 dc into the same stitch, ch 2, sl st into the same space* around. (6 petals made behind the second set of 6 petals).
For a three layer flower, stop here and continue to the pattern for the center of the flower. Weave ends or leave a long tail for sewing on your project. If you’d like a larger flower, keep going.
 Round 7: ch 5. You will bring this chain behind the first petal on the previous round and sl st into the ch 1 space between the petals. Do this behind each petal. Behind the last petal, sl st into the first ch 5 space.
Round 8: ch 2, 7 dc into the same ch 5 space, ch 2, sl st into the same space. *sl st in the next ch 5 space. ch 2, 7 dc into the same stitch, ch 2, sl st into the same space* around. Cut yarn and weave ends. You may wish to leave a long tail for sewing your flower onto the hat. (6 petals made behind the third set of 6 petals).
If you’d like to make an even larger flower, it’s simple. For the odd rows, you will add one extra chain stitch. For the even rows, you will add one more double crochet. In other words, round nine would be exactly the same as round 7, but with 6 chains behind each petal. Round 10 would be the same as round 8, but with 8 dc in each chain space.
Bobble for Center of Flower
ch 3.
Round 1: 7 dc into the first st. Sl st to the top of the first dc. Ch 1. (7)
Round 2: sc into each st. Sl st to the top of the first sc. Fasten off and leave a long tail for sewing onto the flower. (7)
Flower Crochet Pattern Helpful Hints:
• To keep the center bobble extra “bouncy, ” leave the center tail several inches long even after weaving ends. Stuff this tail inside the bobble to keep it from flattening out over time.
• Leave a long tail if you’d like to sew your flower directly onto a project. My preference is to cut the yarn, weave my ends, and attach the flower onto an alligator clip or pin.
Share this article
Related Posts


Latest Posts


